
Rethinking the AP Argumentative Essay: Step 1
Greetings Foreign Language Educators! I have not been the best with my posting lately… This one is for AP teachers, but I think the ideas can be used for other levels as well.
This year, the College Board changed the name of the Persuasive Essay to the Argumentative Essay (which really makes more sense). I do not think I have ever done a great job with preparing my students for this task, so one of my goals this year was to overhaul how I tackled it. I have been working with one of my amazing colleagues who is the AP Spanish teacher (shout out to Anna!) at one of my district schools and one of our instructional coaches (shout out to Colleen!) and how best to do this. Our idea was to break it down into a few manageable sections. My decision was to add a new section every unit to end up with a full argumentative essay at the end of a few units. That way, it would not be too overwhelming and I could be covering the other tasks as well.
So Step 1 is to start the ball rolling with the 3 sources! To review: Source 1 will be an article of some sort. Source 2 will be a graph or chart and source 3 will be an audio. Students must reference all 3 sources in their essay. The first challenge for students is to understand the sources and challenge two is to figure out how to use them appropriately. Students need not use them in order and they do not need to use them equally.
- Introduction to Argumentative Essay I give the students a brief introduction to the essay task and show them the directions they will encounter on the test.
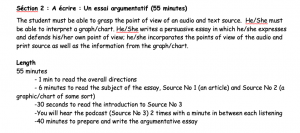
I ask them to read the information on their own and then they come up with 1 comment and 1 question about it. It should lead to a nice, but quick conversation about students’ concerns about the task.
2. Using Source No 1: Article The goal is to determine what information you can pull from the article to prove or disprove your claim.
- Take 1 color highlighter and highlight the information that would prove YES to the argument.
- Take a 2nd color and highlight the information that would prove NO to the argument.
After working through the article, I put up a Menti. (Mentimeter.com- It allows participants to answer questions anonymously and post the responses so all can see them.) I ask students to pick if they would pick YES or NO based on the reading. Then I ask them to share their strongest piece of evidence that they pulled form the article. This will allow students to see if others picked out the same evidence and to get some different perspectives.
3. Using Source No 2: Chart The goal is to determine how you can manipulate the information in the chart/graphic to prove your point or to disprove your point. After looking at the chart, answer these questions:
- What is the chart/graphic trying to tell us? What information is it stating?
- What inferences can we make from the chart/graphic?
- Using this information, do you think you can argue YES or NO?
Students will then participate in a Listening Dyad. These are the directions:
- Find someone with a different answer than you.
- This activity will include a speaker and listener. Each person is given equal time to talk. The listener does not talk; a dyad is not a conversation.
- The first speaker will be given 1.5 minutes to discuss his or her ideas. The listener simply listens.
- You will switch roles and start the process again.
DO YOU WANT TO CHAGE YOUR POINT OF VIEW BASED ON YOUR PARTNER’S ANSWER? My hope is that students will see two ways to use the information from the chart.
4.Using Source No 3: Audio The goal and most important aspect in using source number 3 is to get something out of it that you can use- whether it proves you point or can be used as an acknowledgment for the other side of the argument.
- Fill in in a YES- NO T chart with what you hear .
Students will then participate in Snowball Conversations.
- You will begin in pairs, responding to the discussion question: WHAT ARE YOU POSITIVE THAT YOU HEARD IN THE AUDIO?
- After each person has had a chance to share their ideas, the pair joins another pair, creating a group of four.
- Pairs share their ideas with the pair they just joined.
- Next, groups of four join together to form groups of eight & again share their ideas.
This allows students to verify what they heard and get a few more ideas from the audio.
5. Take a position Write your position. Determine how 2 sources prove your point and 1 source acknowledges the other side. I give them some sentence starters in the target language to help them (Source No___ is saying, indicates, signifies, etc.)
6. Peer edit I lead students through a Round Robin Brainstorm. They are placed in groups of 3.
| ROUND ROBIN BRAINSTORMING | |
| Partner #1
What is your peer’s position? Comment on your peer’s evidence to support the position. Use the sentence starters below to provide feedback. · I like the way you.. · I was surprised that… · I didn’t understand… |
|
| Partner #2
After reading your peer’s response and the comments from the box above, add an additional piece of feedback. Then, specifically comment on the evidence used to acknowledge the other side of the argument. · I liked how you acknowledged the counterargument by….and refuted it by… · I was puzzled by the way you…
|
7. Self Reflection After reading the peer feedback, students think about their ideas.
- Based on the feedback from above, one area I did well on was…..
- And based on the feedback, one area that I could improve on is….
Hopefully, the students have a strong sense of how to use the 3 sources to create their argument after these lessons. Step 2 will be creating a thesis statement and an introductory paragraph, using the source that they just studied.